

If you have not tried oil painting before, the thought of it may make you think about the tedious and time consuming setting up and cleaning up, the numerous materials needed, the messy studios with paint everywhere etc. Many people are afraid of starting oil painting or are put off of it when they try to learn due to the fact that it seems more difficult to learn. Compared to other traditional painting mediums like acrylics and watercolours, oil painting does feel like there’re are a lot more steps and materials you need. But once you actually start to learn it, you’ll find that it’s not as complicated as you think.
When I first started, I was very overwhelmed as well. I watched numerous oil painting tutorials online trying to learn how to oil paint. In the end, actually getting hands-on and painting helped me learn a lot faster through the process of trial and error.
In this post, I will be going through how I set up and clean up whenever I oil paint. I’ll also give you some tips on what you can do to save some time and also some money-saving tips! At the end, I will share with you some resources that I’ve used which I hope will be able to help you as well.
Setting up
First, you’ll need to have all your materials ready. I’ve written a post on oil painting for beginners which covers that, you can see it by clicking here.
Here’s a photo of my set up every time I paint. I do not have an area specially for painting. If you do, then good for you, you can skip a lot of setting up to do every time you paint. I paint on the table in my bedroom. It is quite small but just big enough for me to fit what I need for oil paint.
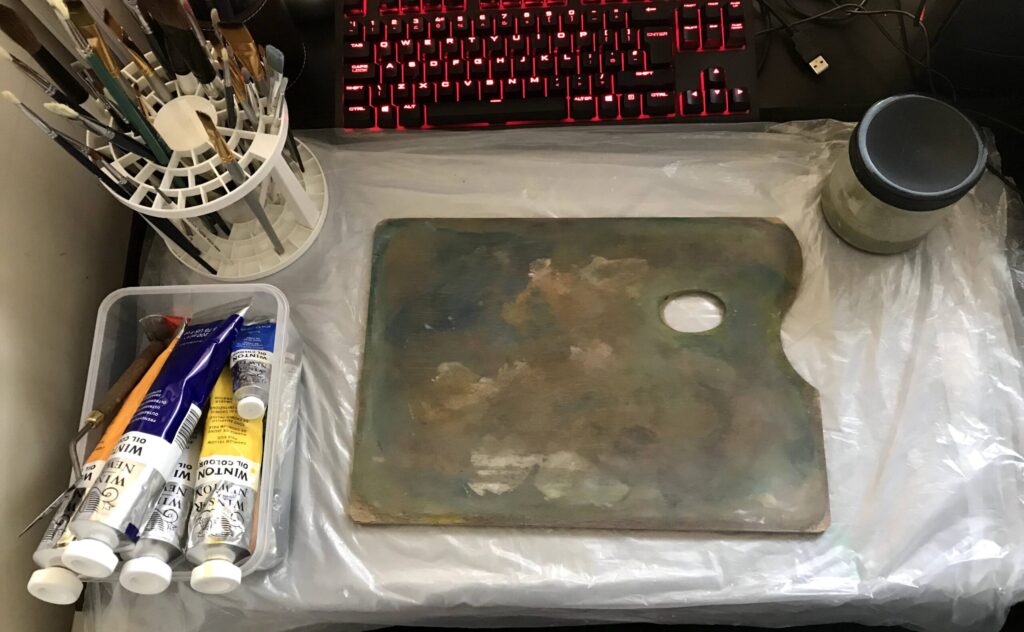
I cover the table area with plastic sheets for protection. In the center, I have my wooden palette where all the mixing takes place. on the left, I have my brushes all in a stand and oil paints in a box. On the right, I have my paint thinner. As for palette knives, I usually put them in a pocket on my apron that I use when oil painting.
I have a tall easel to my right where I place my canvas on.
Above is my set up when I oil paint, the space used is pretty small but it’s enough for me to paint. It takes me around 5 minutes to set everything up so it’s not a long time even tho I have to do it every time I want to paint as I use the same table for other purposes like reading, working on my laptop, digital art etc. If you’re blessed with a larger space or even a dedicated space for painting, then you can save some time with setting up.

Cleaning up
My cleaning up process includes:
- save unused paint into a container
- wipe my palette
- clean it by wiping with paint thinner drenched cloth/ tissue then clean everything with soap
- clean my brushes with soap
- pack everything away
If you use disposable palettes, you can skip the steps on cleaning your palette.
To properly clean my brushes so they can last longer, there are a few steps that I usually do. I first swirl it around in paint thinner to get rid of most of the paint in the brushes. Then I put some soap on my hand and swirl the paintbrush around in the soap, you’ll be able to see all the paint hidden in the brushes come out. After that, I simply rinse with water to complete the cleaning process. Always clean your paintbrushes after your painting session if you want them to last longer! Still, old or damaged paint brushes can be used to create different textures so don’t throw them away!

How to Save money on paint
Every time after a painting session, I’d have some paint leftover. This will probably happen a lot to you too. So here are some ways you can try to waste less paint:
- Don’t squeeze out too much paint, this is pretty obvious. However, don’t be too stingy either or you’ll have to keep sqeezing paint out which can be a pain.
- Place them in an air tight container, put in a fridge or cooler if you want them to last longer.
Personally, I like to mix all the leftover paint together and usually, I’ll get a nice muted colour. Then I put them all in an airtight container. muted colours are good for toning down my colours when I feel like my colours are too saturated.
Take note: Oil paints dry from the outside inwards. So if you have a pile of paint that has a dried layer outside, you can poke through the film and get the fresh paint inside.
How to Save money on paint thinner
Paint thinner is a very crucial material that you’ll need for oil painting, and it is also the easiest to save money on! You can actually reuse most of them. Just leave them standing still for a day or two, you’ll find all the paint residue stuck at the bottom, leaving the paint thinner above clear again to be reused. I have a few jars that I use. One is for the dirty paint thinner to sit until all the paint sinks to the bottom. Another jar is to transfer the cleaned paint thinner in so I have it all ready for the next use. I paint a few times a week and I’ve not bought new paint thinner for a very long time with this method, at least more than 6 months I’d say.
Some Resources
Here’re some links to YouTube channels that have helped me a lot when I first started learning how to oil paint:
I hope you’ve enjoyed reading this post and has found it useful. If you purchase anything through the affiliate links that I’ve provided, I’ll get a small amount of commission (at no extra cost to you!) which helps me continue writing art-related blog posts and tutorials like this one.
You may also be interested in:
- Types of oil painting canvas and surfaces
- Arcylic vs Oil paint – differences and similarities
- Different types of painting mediums in art
- Oil painting basics – tools and materials

Support me on Ko-fi! Your donations and support mean a lot to me and it helps me keep doing what I’m doing!
Like my artworks? You can get them in prints, stickers or badges form on my Etsy shop!
Follow me on Instagram to see more of my art!


