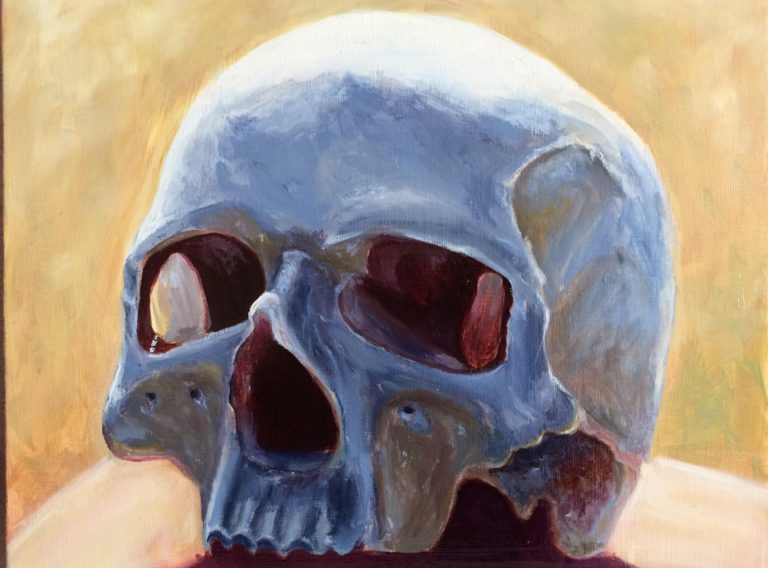

Oil painting is one of my favourite art mediums to work with. It’s been almost a year since I last did any oil painting. I’m planning to get back at it again. So I decided to start on something not too difficult for me. The picture above is my final result.
In this post, I will be going through the process of how I completed my first oil painting after a year’s break. I’ll show you the materials and some techniques I used. This is just how I painted this particular painting, it is in no way how you should oil paint and I still make lots of mistakes. The way I paint will vary according to the subject to be painted and also change as I learn more techniques and improve.
Below is a free stock photo I downloaded and printed out from Pixabay, I used this photo as reference:

I drew it in colour pencils last year. Here’s the drawing:

As you can see, I didn’t quite follow the colours on the reference photo as I was still new to colour pencils. So, I’m going to draw it again, but this time using oil paints.
Materials
First, I’ll show you a list of materials I’ve used for this painting:
Oil Paints
- Winsor & Newton: cadmium yellow, alizarin crimson
- Daler Rowney: french ultramarine blue, titanium white, burnt umber
For the oil paints, I’m trying to use a limited palette of cadmium yellow, alizarin crimson, French ultramarine blue, titanium white and burnt umber. For this painting, I used paints from different brands. It is suggested to use paints from the same brand for better mixing of paint. I’ll stick to Winsor & Newton paints after I’ve finished using the other brand.
These 5 colours will be able to mix most colours you see around you. Using a limited colour palette can save you lots of money by not buying unnecessary premixed colours which you can mix from the 5 colours mentioned above. The limited colours may not be able to mix some very bright and vibrant colours. However, these colours are not often seen in real life environments. They can be seen on photos that have been manipulated or overexposed.
I’ll be writing a post on how to mix using those colours in the future 🙂
Brushes
- ProArte Polar brush
- Round brush size: 1,5,10
- Flat brush size: 1/2 inch
Paint thinner/ brush cleaner
- Zest it
Turpentine is usually used for cleaning paint brushes and diluting paint in oil painting. However, they have a very strong smell and may irritate the lungs. I used an alternative called Zest It, it is a healthier alternative and has a nice citrus scent.
Others
- Wooden easel – to support the canvas
- Palette knife – for mixing paints
- Colour wheel – for mixing paints
Stage 1

I like to start my paintings with a sketch. I mixed a random earth colour and diluted it with paint thinner before I began to sketch out the basic shape of the skull. When I make a mistake I just wipe it off with a piece of tissue slightly soaked with paint thinner. In a way, it’s like painting in watercolour. I don’t have to worry about being messy or too precise here as the sketch will be completely covered later on.
Stage 2

Here I coloured in the background and some basic colours for the skull with some variation in value and colour.
I’ve made a mistake of painting too light here. Usually, for oil paints, we go from the darkest colour to the lightest. In the photo above, my painting is clearly much lighter than the reference photo.
The shape of the skull is not very defined here yet and it kind of looks like it’s melting. XD
Stage 3

I tried to correct the mistake I’ve made earlier by blocking in the skull with some darker colours. I’ve also refined the shape of the skull as my sketch at the beginning was a bit off.
Some green was added to the background for some colour variation.
Stage 4

I felt like some parts were not dark enough so I darkened them a bit more.
I’ve also started blending my brush strokes. There are painting styles where the brush strokes are intentionally very lose and visible. But for this painting, I’m going for a slightly more blended look.
Here you can see that the form of the skull is beginning to show.
There are many subtle colour variations on the skull: green, yellow, orange and red. I’ve tried to add them.
Stage 5 – Final stage

Here I’ve added some final details on the skull, added in more colour variations, fixed the shape of the skull a little more and lightened up the background to give more contrast and emphasise the fact that there’s not alot of light hitting the front of the skull.
Finally, I coated the painting in varnish to restore some vibrancy and for preservation.
That’s it!
I’ve enjoyed painting this piece as an icebreaker between me and oil painting. It wasn’t as detailed as I wanted it to be but it was a nice warm-up piece. I look forward to painting more and sharing my processes with you.
I hope you’ve enjoyed reading this post and has learnt something new from it.
You may be interested in:


2 Responses
I found this post very interesting, it must have been quite a challenge to paint this, you have done extremely well.
I’m interested to know why you chose this subject to paint.
I have written a few comments about your web site as you know because I am very interested in the great progress you are making and the very informative posts you are writing.. Keep up the good work.
You certainly deserve to get some commissions 🙂
Well done.
I’ve chosen to paint this photo of a skull as I thought it would be relatively easier for me to paint since I’ve done it before in colour pencils. Since it’s been a while since I last oil painted, I wanted to start off with something not too difficult for me. Also painting the skull helps with my study of anatomy as well!
Thank you for your compliments! 😀