
Welcome back to my tutorial on how to use the Procreate App! In this post, I will be talking about the colour interface that’s available in Procreate. Colours are an important part of creating your artwork. Being able to choose the exact colours you want quickly and effectively will be beneficial to your workflow. The colour interface in Procreate allows you to pick colours accurately and save and edit colours in a colour palette.
The procreate app gives you a few different colour interfaces for you to choose your colours. They are named: Disc, Classic, Value and Palettes. When you tap on the colours tab, you will see the 4 options at the bottom of the pop-up screen. The top right shows 2 colours, the colour on the left shows the previous colour you used. The colour on the right is the current colour you’ve picked. Press and hold on the colour tab to switch between the 2 colours without having to open the colour tab.
Disc

Select the hue of your choice in the outer ring, then choose the value and saturation in the inner circle.
Pinch outward on the inner circle to expand it for more colour range.
Classic
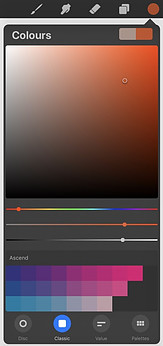
If you’ve used other digital painting software, you might be familiar with this version of the colour picker.
choose your hue using the first slider. then adjust your value and saturation by either adjusting the bottom 2 sliders or moving the circle pointer to your desired position.
Value
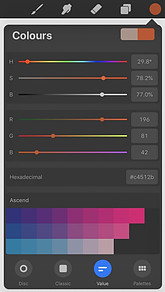
If you want to be more exact with your colours, you can use the value picker. There are 3 options, HSB, RGB or Hexadecimal input.
HSB(Hue saturation brightness): adjust the colours by either inputting numbers at the right side or sliding the sliders
RGB(red green blue): adjust the colours by either inputting numbers at the right side or sliding the sliders
Hexadecimal: If you have the hexadecimal value of the colour you want, just input it in the box on the right.
Palettes
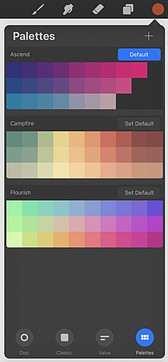
Here stores all your saved colour palettes.
Swipe left on a palette to delete or share it.
Tap and hold on a colour to delete it or change it to your current colour.
Tap on the + sign at the top right to create a new palette
Tap on the palette name to edit it.
Set a default palette and the palette will show up on the other colour interfaces (disc, classic, value)
To save the current colour to a palette, tap on an empty area in the palette.
Organise your colours in a palette by holding and dragging the colour to it’s desired position
Conclusion
So those are what you can do under the colour tab in the Procreate canvas interface. By getting used to switching colours and saving your frequently used colours, your creative workflow will definitely become more efficient.
I hope you’ve enjoyed reading this post. Feel free to leave a comment or ask a question down below.
Try out the Apple Pencil to bring your creative process to the next level on the Procreate App!
These artist gloves for digital painting are a must for me when I paint on the iPad, when I don’t wear the gloves, sometimes the Procreate app sense my palm resting on the screen as 2 fingers tapping and holding and start undoing! Or sometimes it starts colour picking. I’ve tried the different palm support options but I still get the problem sometimes. If you’re having these kinds of problems as well, the gloves may be your solution, it makes you feel and look more professional too!
You may also be interested in:


One Response