
Adobe Photoshop is not only a powerful photo editor, but it is also one of the industrial standards for digital artists and illustrations. You can also create graphic design and animation with Adobe Photoshop. It is now available on the iPad as well so you can create wherever and whenever you want. I have used photoshop for over 4 years, mainly for digital paintings. With so many functions and options available in the app, it was daunting when I first started learning how to use it. Throughout the years I slowly got to know photoshop more and am able to make good use of more functions to improve on my paintings and workflow.
In this series of tutorials, I will be going through various sections of Photoshop so that a beginner can easily and quickly learn how to use the application for his or her own needs.
In this tutorial, I’ll be going through some things you’ll need to know before you start doing anything on the canvas. Things like setting up the canvas, the workspace interface, useful shortcuts etc.
Homepage interface

When you open Photoshop, you will be shown your work in cloud document or your recent projects that you’ve worked on. On the left side you have a list of options:
- Home
- List of recent projects you’ve worked on, click on one to open it.
- Learn
- Various tutorials on how to use the photoshop app, from beginner to more advanced, there’s also an interactive tour of photoshop which may be useful if this is the first time you’re using photoshop.
- Lightroom photos
- Library of photos in your Lightroom application
- Cloud documents
- Projects you’ve saved to your adobe cloud, click on one to open it.
- Deleted
- Recent projects that you’ve deleted
- Create new
- Creates a new canvas/ project
- Open
- Open an existing project or photo from your cloud documents or on your computer.
Creating a new canvas
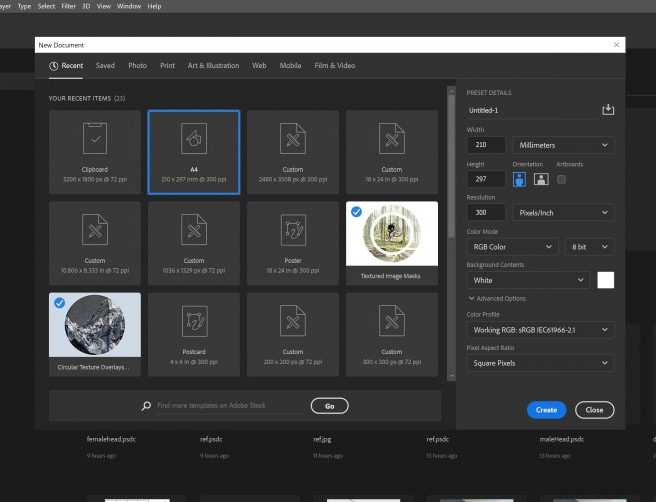
to create a new photoshop document/ canvas/ project, click on the ‘create new’ button on the left side. A window will pop up where you can see many pre-made sizes and templates which you can choose from. Can’t find what you’re looking for? you can create a custom canvas and decide on your own settings. For a beginner, an A4 size canvas on 300ppi would be a good start. If you want to make your own settings, look to the right of the window and you will see preset details that you can change from. Some common ones you might want to change are:
- Width and height
- Width and height of the canvas, available in different units of measurements.
- Orientation
- Decide whether you want your canvas in portrait or landscape mode.
- Artboards
- Enable it and you can have multiple canvases in one project, good for web design where you need to design multiple pages.
- Resolution
- The quality of your image, the higher the number, the better the quality, but also the bigger the file size.
- Colour mode
- Decide on your colour mode, the common ones are greyscale for black and white only, RGB for artwork only to be shown digitally, CYMK for artworks that will be printed out.
- Background contents
- You can have black, white, custom or transparent background colour. This can be changed later on.
- Advanced options
- Colour profile and pixel aspect ratio. As a beginner, you won’t need to know this.
Workspace Interface overview
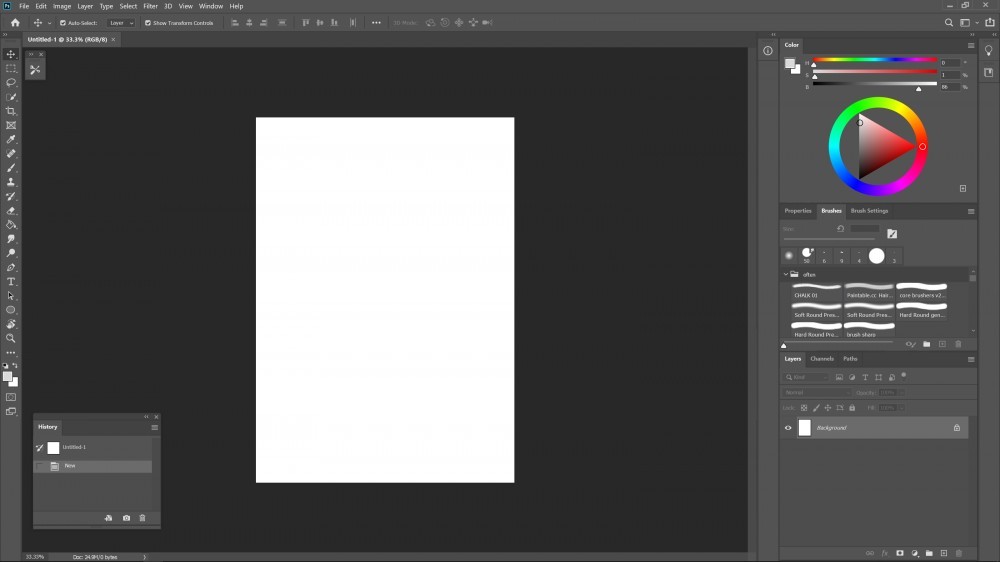
Canvas area
This is where all your painting/ editing takes place. You can zoom in or out with ctrl+ and ctrl-, pan around with mouse while holding the space bar down.
Menu bar
Located at the top of the workspace, it allows you to carry out lots of functions like file management, editing, adjustments etc.
Panels
On the right side, you will see the panels column. Different panels have different functions. By default, you should see colour panels and layers panel etc. Panels can be grouped and can have multiple tabs. The position and grouping of panels are highly customisable, simply drag it with your mouse. Panels can be grouped or dragged around the whole work area. You can find all the available panels in the windows option on the menu bar. As you can see from the screenshot above, I have my history panel on the bottom left side of my workspace.
Tools Bar
On the very left you can see a vertical column of icons, this is the tools bar. There are various tools for editing and painting. right-click on a tool icon to see multiple options.
Options Bar
under the menu bar. The options available changes depending on the tools you’re currently selected to.
Saving Your Work
You can save your PSD file on adobe cloud documents or on your computer.
Go to: file -> save, then choose where you want to save your PSD file. Or simply press ctrl s. Once you’ve saved your file at a location, you just have to press ctrl s for future saves in the same file. Remember to save often! It is common for photoshop to crash or lag and lose your progress if you forget to save.
file -> save as, allows you to save your current work progress as a new file so you can have multiple saved versions.
Exporting Your Work
file -> export -> quick export as png. This exports your work as a png file.
File -> export -> export as. Here you can decide if you want to export your work in png, jpg, gif or SVG format. For png files, you can decide if you want transparency on or off. You can also change things like canvas or image size before exporting.
Some Useful Shortcuts
undo: ctrl z
redo: ctrl shift z
zoom in: ctrl +
zoom out: ctrl –
pan around: hold on the space bar, drag with the mouse
save: ctrl s
So these are the main interface of Adobe Photoshop. I hope it has helped you to get started. In the future posts, I will be making tutorials on the tools bar, each option on the menu bar, customisation, brush settings etc. See my list of Adobe Photoshop tutorials here.
I hope you’ve enjoyed reading the post and have learnt something new from it. Feel free to leave a comment or ask a question down below.
A pressure-sensitive digital table is a must if you’re planning to do illustrations and paintings on Adobe Photoshop. Below are the 2 pen tablets that I’ve personally used and recommend. Having pressure sensitivity is going to give you so much more control on your lines and brushes which will, in turn, help your workflow and help you produce better results. I mainly use the Wacom Intuos which I’ve had for over 5 years. I’ve also gotten myself a Huion H420 as a backup pen tablet in case my Wacom Intuos suddenly stops working. The Huion H420 is a lot smaller but it’s still good to use and very cheap as well, great if you’re on a budget. They both have 2048 levels of sensitivity.
Wacom Intuos
Huion H420
If you are reading this tutorial you probably already have Photoshop. If you also want to try out other creative cloud software from Adobe, check out the various Adobe creative cloud subscriptions here! If you click on any of the affiliate links above, I’ll get a small commission(at no extra cost to you) that’ll help me keep writing tutorials and reviews like this one.
You may also be interested in:


8 Responses
Hello, I really appreciate this tutorial on Adobe Photoshop which is probably the best photo editing software tool in my experience, it’s the one I use to create creative media for my clients.
The way you laid it out is perfect and informative, this is a great little guide for beginners who are just getting started. I love the shortcuts you mentioned which does save a lot of time. I recommend Adobe Photoshop and give it 4.5 out of 5 stars.Thanks for sharing your tutorial.
Thanks! Glad you liked the layout of the tutorial 🙂
Thank you so much for the awesome post! I just got Adobe Photoshop a few days ago, and it is so confusing. I’m glad I found your tutorial on it, that way I can start to use it effectively. The workspace interface has been the most confusing part for me. I think that you have cleared up some of my issues with it! Thank you! There is so much to Photoshop!
Thanks! Glad my post has helped you 🙂 I’ll be making more tutorials on photoshop in the future.
Hello, I really want to appreciate your effort in putting together this website and writing this article. Adobe photos hop is a must for every graphic designer although I have seen some alternatives but it cannot compare. Both pen tables are excellent for graphics when using Adobe photoshop the flexibility is awesome and I will recommend to my friends
Thanks!
Even though I don’t have Photoshop, I am intrigued by what I have read. You make it so appealing that I would like to try my hand at designing..
You have made the tutorial so engaging, I felt compelled to keek reading. Good work.
Navigation was fast and intuitive. The links that i tried opened in a new tab. That’s great.
Thanks! Glad my post was interesting for you^^